 Capt. Horatio T.P. Webb | Spring 2015 Last Updated 12PM 1/6/2015 | |
Google provides web developers the opportunity to embed Google maps into their web pages. This functionality allows the developer to use some simple javascript to define and present Google maps on their web pages in a wide variety applications.
The primary documentation for this processes is:
https://developers.google.com/maps/documentation/javascript/tutorial
This documentation identifies some specific steps that you must take to get started. Specifically:
You must obtain an "API key" for your web application. This is simple to do.
https://accounts.google.com/SignUp
https://developers.google.com/maps/documentation/javascript/tutorial#api_key
You will be required to login with your Goggle Account.
<DOCTYPE html>
<html>
<head>
<script async defer
  src="https://maps.googleapis.com/maps/api/js?key=your API KEY goes here&callback=initMap">
</script>
This script code provides all the client side javascript you will need for your application. It also records your usage via your API key. If you have a heavy usage you may be required to pay Google. Check out these two pages:
https://developers.google.com/maps/documentation/business/articles/usage_limits and
https://developers.google.com/maps/faq#tos
There are many things you cannot do. See:
For example, the DIV block below creates 900x900 pixels space for the map with a 1 pixel solid black border with id="myMap_canvas":
<DIV id="myMap_canvas" style="width:900px;height:900x;border:solid black 1px;"></DIV>
The map is created with two javascript steps:
The javascript for the map options sets the various map parameters. The general structure is:
var name for the map options = {
  1st option : 1st option value ,
  2nd option : 2nd option value ,
  3rd option : 3rd option value ,
  .
  .
  .
  };
There is a long list of possible map options. Here are the most common ones:
center : new googlemaps.LatLng( latitude value , longitude value )
This centers the map at the stated latitude and longitude.
You can use three different numeric formats:
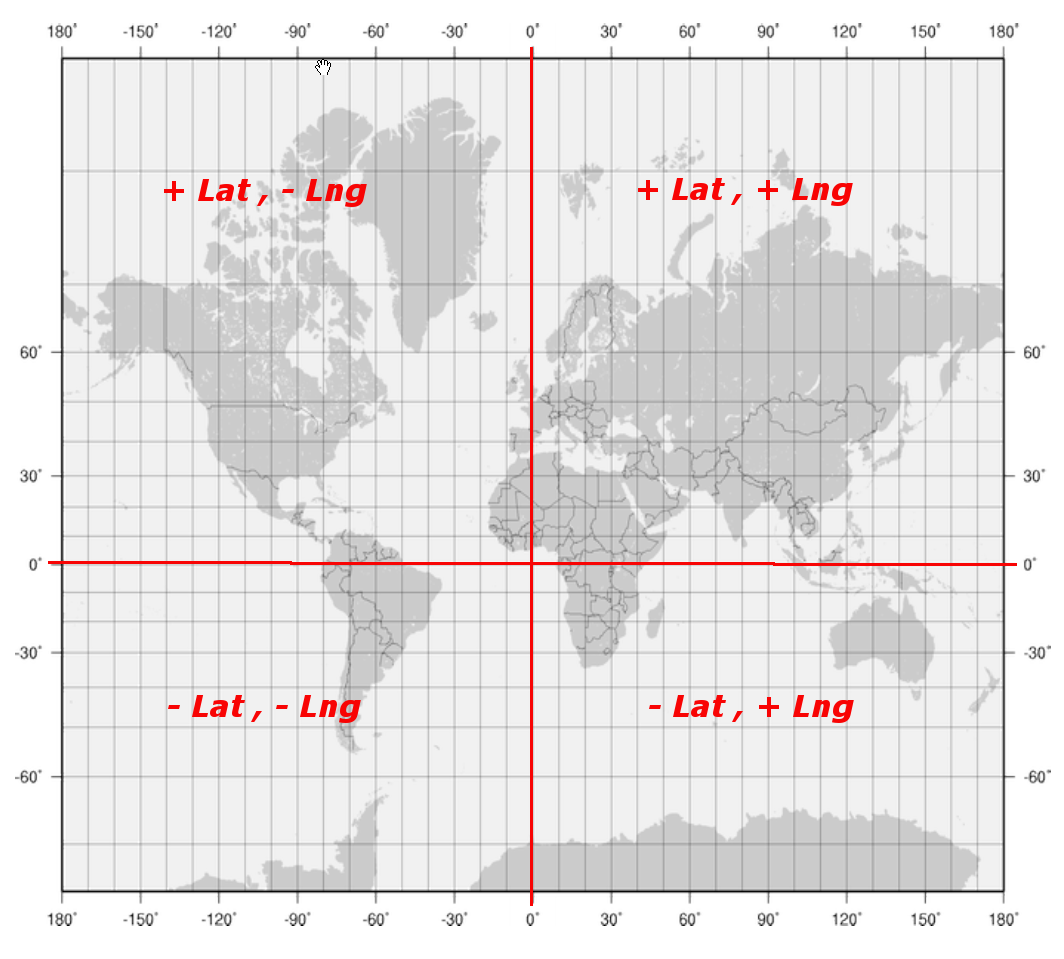
for latitude use a real number between -90.0 and +90.0 (0 is the equator).
for longitude use a real number between -180.0 and +180.0 (0 is Greenwich England).
for example,
Houston's latitude is about 29.761758, Sydney Australia's is about -33.867080
Houston's longitude is about -95.369019, Sydney Australia's is about 151.214257
an integer degree (-90 to +90) and a decimal minutes (between 0.0 and 60.0) for latitude and
an integer degree (-180 to +180) and a decimal minutes (between 0.0 and 60.0) for longtitude
for example,
Houston's latitude is about 29.759374,
so take the decimal portion and convert it to minutes by multiplying by 60.0 ( or .759374 * 60.0 = 45.46244)
the result is: 29 45.46244
Sydney's's latitude is about -33.867080,
so take the decimal portion and convert it to minutes by multiplying by 60.0 ( or .867080 * 60.0 = 52.0248)
the result is: -33 52.0248
Houston's longitude is about -95.369019,
so take the decimal portion and convert it to minutes by multiplying by 60.0 ( or .369019 * 60.0 = 22.14114)
the result is: -95 22.14114
Sydney's's longitude is about 151.214257,
so take the decimal portion and convert it to minutes by multiplying by 60.0 ( or .214257 * 60.0 = 12.85542)
the result is: 151 12.885542
an integer degree (-90 to +90), an integer minute (0 to 59) and a decimal seconds (between 0.0 and 60.0) for latitude and
an integer degree (-180 to +180), an integer minute (0 to 59) and a decimal seconds (between 0.0 and 60.0) for longtitude
so take the decimal portion of minutes convert it to seconds by multiplying by 60.0
for Houston latitude of 29 45.46244, take 0.46244 * 60.0 = 27.7464, the result is: 29 45 27.7464
for Houston longitude of -95 22.14114, take 0.14114 * 60.0 = 8.4684, the result is: -95 22 8.4684
for Sydney latitude of -33 52.0248, take 0.0248 * 60.0 = 1.488 , the result is: -33 52 1.488
for Sydney longitude of 151 12.885542 , take 0.885542 * 60.0 = 53.13252 , the result is: 151 12 53.13252
Latitude and longitude for Houston and Sydney are shown below in all three formats:
| Houston | 29.761758 , -95.369019 | 29 45.46244 , -95 22.14114 | 29 45 27.7464 , -95 22 8.4684 |
| Sydney | -33.867080 , 151.214257 | -33 52.0248, 151 12.885542 | -33 52 1.488 , 151 12 53.13252 |
DO NOT include N, S, E, W for degree directions (instead of + or -) or ° or " for minutes and seconds
Finally you put all of this together in a single line like this:
center: new google.maps.LatLng(latitude value , longitude value),
This feature places a control that allows the user to choose the type of map that is displayed (road map or satellite views). To include this option use:
mapTypeControl: true | false
If the mapTypeControl is true, then to control the type and placement of the map type control specify two parameters and choosing one of optional values:
mapTypeControlOptions:{
position: 'TOP' | 'TOP_LEFT' | 'TOP_RIGHT' | 'BOTTOM' | 'BOTTOM_LEFT' | 'BOTTOM_RIGHT' | 'LEFT' | 'RIGHT' ,
style: 'DEFAULT' (depends on the map size) | 'DROPDOWN_MENU' | 'HORIZONTAL_BAR'
}
If not specified, the mapTypeControl is visible in the top right hand corner.
This parameter specifies the initial zoom value. The format is:
zoom: an integer between 0 and 21,
You can specify how and where the zoom control appears using:
zoomControl: true | false
If the zoomControl is true, then to control the type and placement of the zoom control specify two parameters and choosing one of optional values:
zoomControlOptions:{
position: ' 'TOP_LEFT' | 'TOP_RIGHT' | 'BOTTOM_LEFT' | 'BOTTOM_RIGHT' ,
style: 'DEFAULT' (depends on the map size) | 'LARGE' | 'SMALL'
}
If not specified the zoom control is TOP_LEFT
panControlOptions:{
position: ' 'TOP_LEFT' | 'TOP_RIGHT' | 'BOTTOM_LEFT' | 'BOTTOM_RIGHT' ,
}
If not specified the pan control is TOP_LEFT.
With the map controls specified, the second step is to place the map in the DIV block with controls specified like this:
var some_map_name = new google.maps.Map(document.getElementById("id_of_the_DIV_block"), name_of_the_map_options);